

Day 20: What’s the best survival knife…
Failing to prepare is... (preparing to fail)


My personal favorite survival knife…
I just put on a massive discount (see now above)
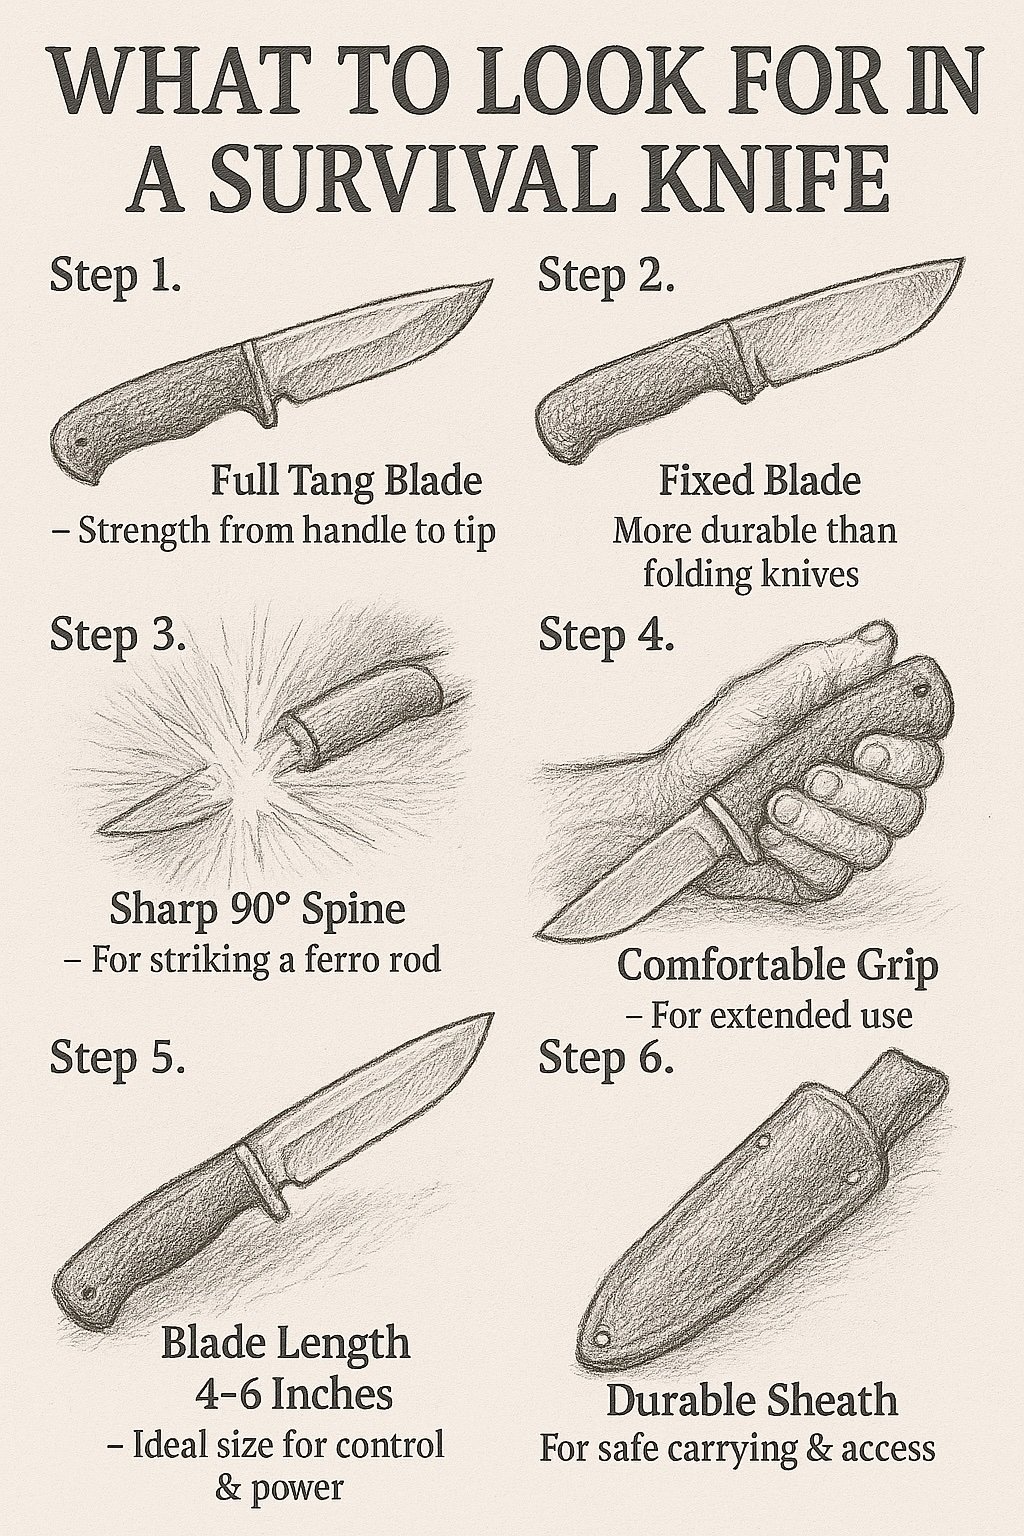
What to Look for in a Survival Knife
The survival knife debate is endless—but there are a few proven truths. These come from decades of field experience, especially from experts like Mors Kochanski and David Holladay, who lived what they taught.
Core Survival Knife Features
Curved edge
A continuous curve allows for draw cuts, which are more effective than press cuts.Blunt-ish tip
Super pointy tips break easily. A slightly rounded tip holds up to hard use.Full tang
One solid piece of steel from tip to pommel = strength and reliability for batoning and chopping.Indestructible handle
No loose parts. No failure points. Needs to survive drops, splits, and prying.Hammer-capable pommel
You should be able to crush, crack, or hammer with the bottom of the handle.
What Not to Look For
Avoid knives that try to do everything.
Knives that look cool but lack focus
Proven Designs
The best knife designs already exist. They’ve been used for generations:
Puukko and Leuku (Lapland)
Jungle parangs and bolos (Philippines, Indonesia)
Simple machetes
These designs are effective because they’ve been refined through real-world use.
Add modern steel and full tang construction, and you’ve got a near-perfect blade.
Top Picks
Skookum Bush Tool – If you can find one
TOPS BOB (Brothers of Bushcraft) – Reliable and well-designed
Anything based on traditional tools with modern materials
Bottom Line
A great survival knife doesn’t reinvent the wheel.
It refines time-tested designs with modern strength.
Stick to simplicity, durability, and field-proven shapes—and your knife won’t let you down.
Step By Step of what survival knife you need
knife characteristics you need video intro…
Day 19: What gun you need in the wild…
Stay ready. Move smart.

Guns: What to Know, What to Carry
Few topics divide people like guns.
What’s the best caliber? Best bug out gun? Best hunting rifle?
The truth: None of it matters if you can’t hit what you’re aiming at.
Shot placement matters more than caliber, brand, or accessory.
Core Principles
Train with what you have—skill beats gear
Ammunition is heavy—in survival, less is more
One gun won’t do everything—you need the right tool for each job
Survival & Hunting: Go Lightweight
When food is the mission, not firefights, choose:
Low weight
High accuracy
Small footprint
High round count
Top pick: .22 LR
500 rounds = one small box
Quiet, light, deadly in the right hands
Field-tested by downed pilots and survival instructors
My go-to setup:
Ruger Mark IV
Red dot sight
Suppressor
Under-barrel light
I’ve used it to take:
Rabbits
Birds
Raccoons
Even deer (with careful shot placement)
Self-Defense: Think Speed and Range
Survival changes when threats are human.
Key needs:
Range
Speed
Mobility
Suppression ability (multiple rounds, quickly)
Top pick: AR-15 (.223/5.56)
Balanced power
Manageable recoil
Lightweight ammo
Effective for both defense and small-to-medium game
Big Game & Long Range
If your goal is taking large game at serious distances (600–800+ yards), reach for:
.308
.300 Win Mag
These rounds punch hard, but they’re heavier and bulkier to carry.
One Size Doesn’t Fit All
You don’t wear the same shoes to church, to work, and on a hike.
Guns are the same.
Start with:
A solid .22 for survival and small game
An AR platform for defense and versatility
Add:
A larger caliber rifle when you're ready for serious range and power
Bottom Line
Master your shot placement
Pack light, especially in ammo
Choose the best tool for the job—then get another for the next job
Don’t fall for “do-it-all” gimmicks. They don’t do anything well.
build the right garage for your mission.

THE PERFECT CAMPING FLASHLIGHT I JUST PUT ON A MASSIVE DISCOUNT SEE NOW^^^
Step By Step of why you need a gun in

my personal gun and other alternatives
Day 18: What to put in a small medkit…
Watch. Learn. Evolve.

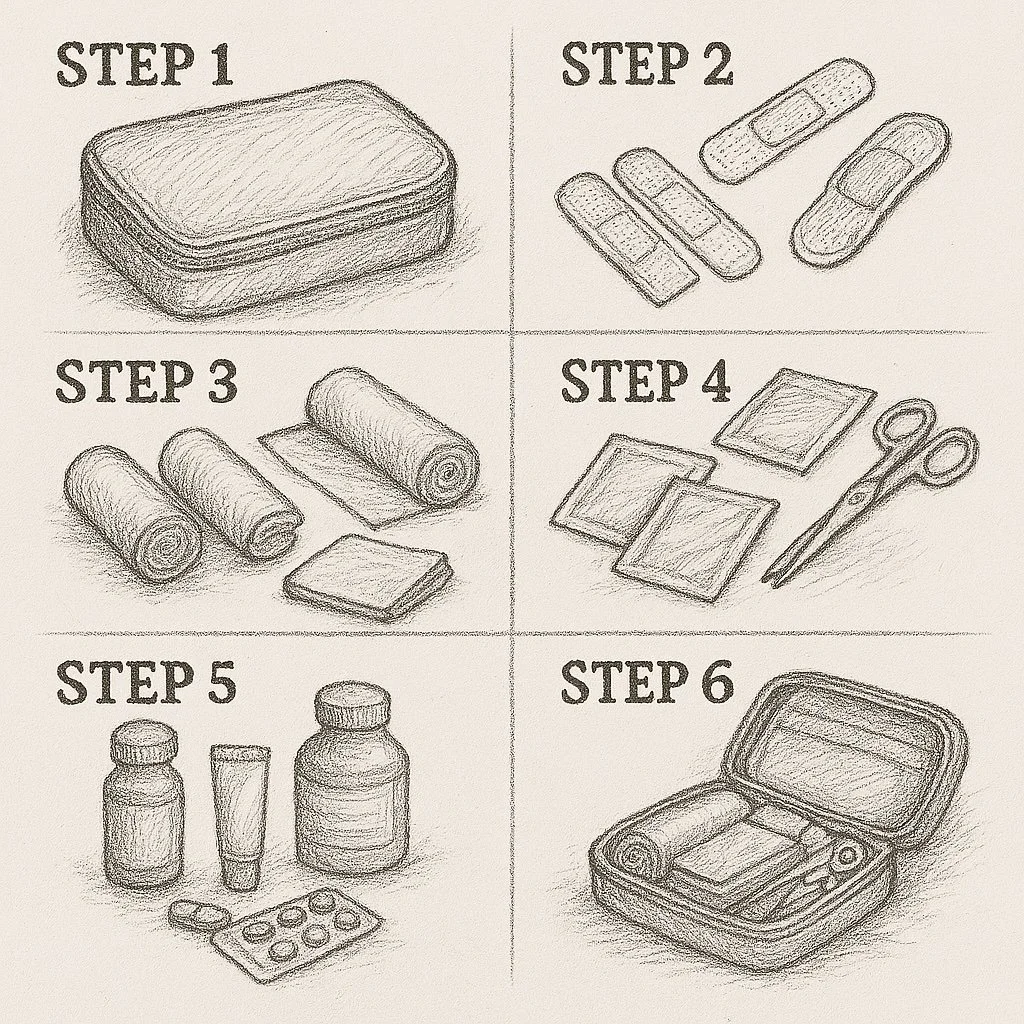
Medical Kits: Keep It Purpose-Driven
Don’t buy generic kits. Build your own to match the job.
1. Match the Kit to the Scenario
Car kit: Major trauma, accidents, full-size bag
Hiking kit: Bleeding, blisters, light meds, compact
Home kit: Long-term care, illness, prescriptions
2. Use a Tiered System
Small kit: On-body, stops bleeding fast
Medium kit: Backpack, deeper care
Large kit: Vehicle or home, full resupply
3. Think About Who You’re Treating
Kids = Band-Aids, fever meds
Adults = Trauma supplies, pain relief
Elderly = Prescriptions, monitoring tools
4. Pack for Real Risks
Build for likely injuries—driving, hiking, farming, etc.
Don’t overpack what you’ll never use
Bottom Line:
Pack smart. Keep it scenario-specific. Know how to use it.

if you don’t have time to make the perfect survival medkit don’t worry…
I did it for you see now to claim your medkit for a hug deal.(Click above)
Step By Step of what you need in medkit
my own survival medkit Instruction Video
Day 17: Bugging out to do or not to do…
Turn pain to purpose.

Bugging Out: To Do or Not to Do?
The debate around bugging out often stems from confusion—people use the same term to mean different things. So, first, define it.
In the military, a bug out bag (BOB) was built to sustain us until resupply—ammo, med gear, batteries, comms, food, water, and mission-critical info. That version isn't ideal for civilian life, but it's a solid foundation.
For civilian prepping, use reverse planning:
Start with the worst-case but still probable scenario in your area—natural or man-made—and build backward.
For example, in Utah, an earthquake would likely cut travel, comms, and access to credit. Prep with:
Overland-capable vehicle
Cash
Firearm and ammo
Alternative comms (SAT/hams)
Flexible shelter/stay-or-go plan
A worst-case man-made disaster (EMP, war, collapse) requires similar prep. You’ll need to decide: stay or go?
And if you’re going, leave early and be fully ready—no last-minute packing.
A civilian BOB should include:
Cash
Ammo
Med kit
Batteries
Laminated info (locations, contacts, passwords)
Physical road maps
Bottom line: Plan for the worst, and you’ll be ready for everything else.
how to bug out step by step

If your off grid you need this tactical flashlight (click above to see deal)

bug out Instruction Video…
Day 16: How to learn lessons from failures…
Patience breeds power.

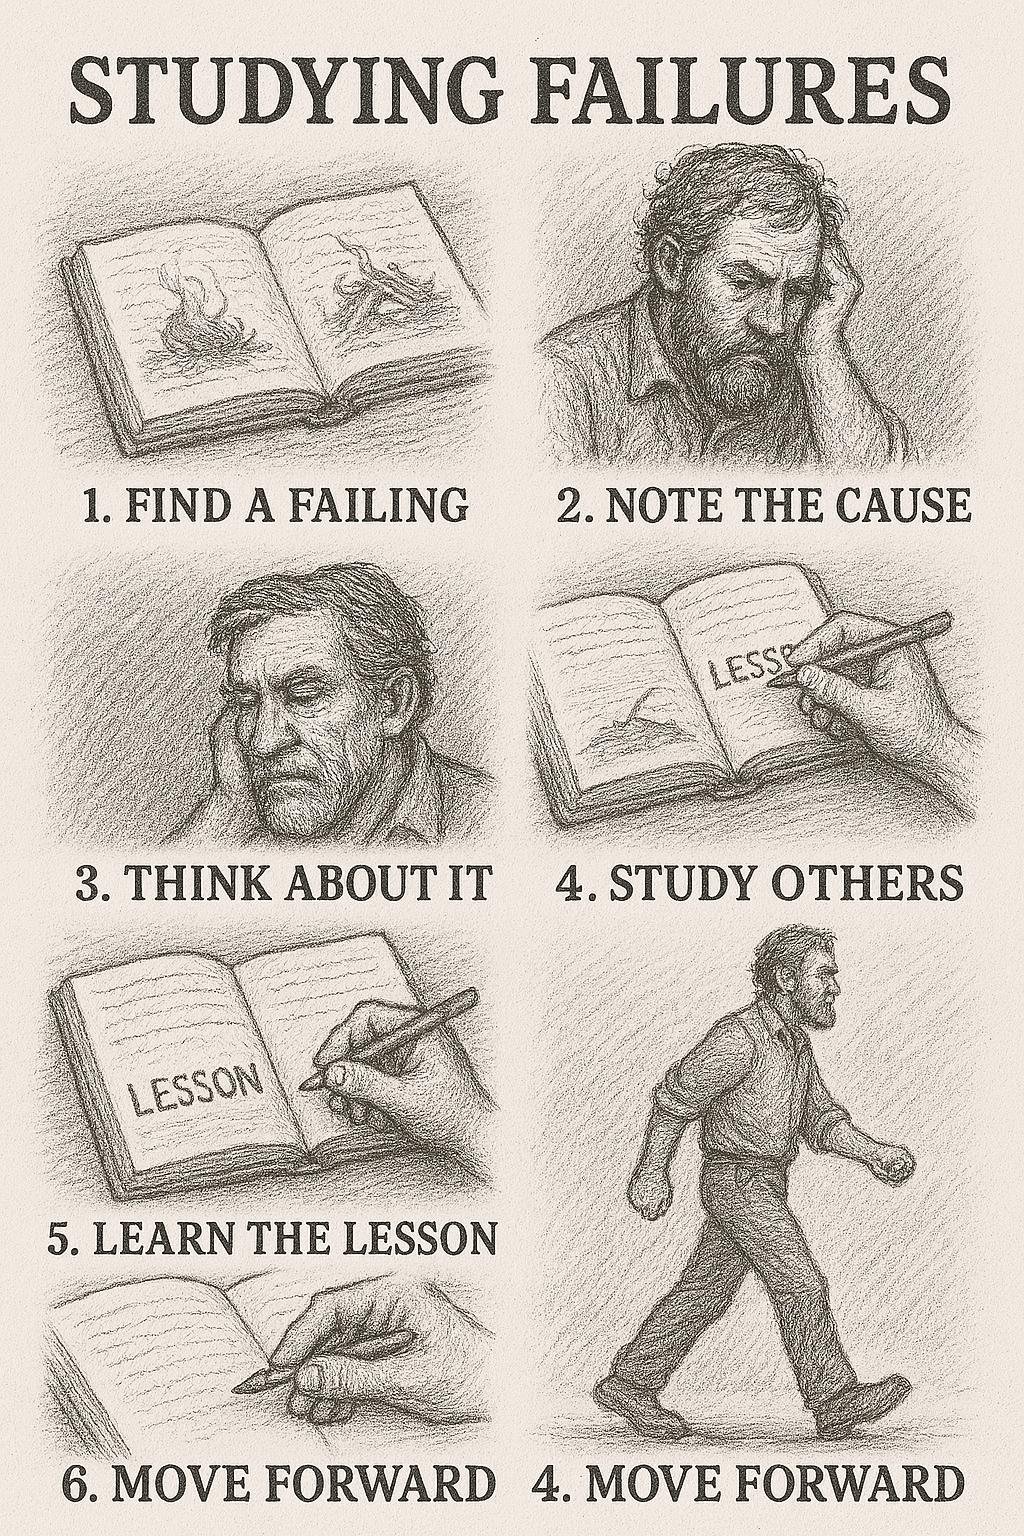
Lessons Learned from the Failures of Others
In the military, we run After Action Reviews (AARs) after every mission.
We ask:
What was supposed to happen?
What actually happened?
What went well?
What needs improvement?
Then we train again—better.
Apply AARs to Survival
You can use the same method to:
Learn from history
Adapt from recent disasters
Prepare for future threats
Key Lesson: Movement = Survival
Most disasters are geographic—famine, war, flood, fire.
Survivors move.
Jewish communities: survived by relocating over centuries
Irish famine: survivors left Ireland
Jasper, BC fires: people drove out
West Virginia floods: families grabbed RVs and bugged out
Don’t hesitate. Move early.
Modern Takeaways
From real-world reports:
Always carry a power source for your devices
Pack protein, not just carbs—you’ll need long-lasting energy
Simple insights—but only if you're paying attention.
Bottom Line
Study failures. Copy success.
Use AAR thinking to prep smarter, move faster, and stay alive longer.

A lesson i learned is you need to keep yourself dry…
This does that for me (Grab yours above)
learning from failures step by step
lessons learned from ukraine (Video)…
Day 15: How to make a jungle tripod…
Bold not broken.
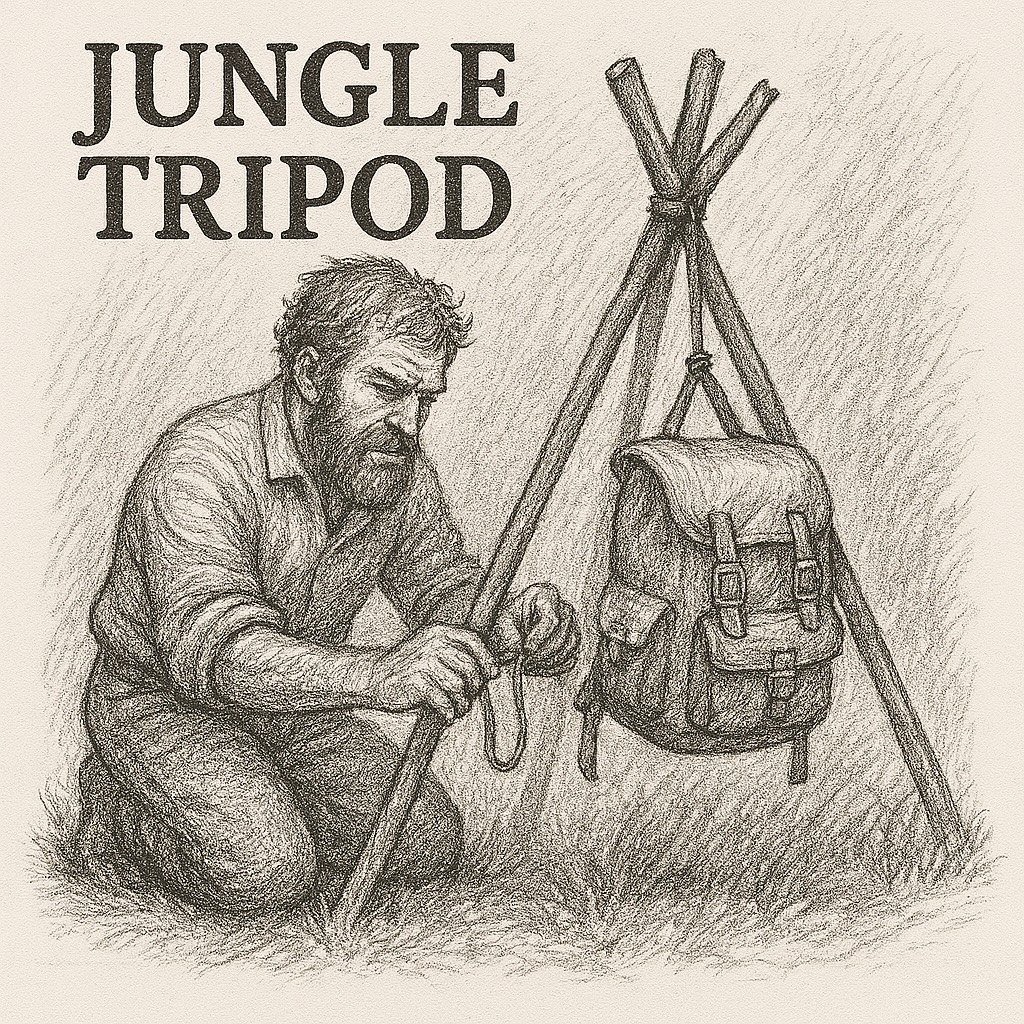
How to Build a Jungle Tripod
Most people think of tripods as camera gear or aluminum frames.
But in the jungle, a tripod is a critical primitive tool—for cooking, hanging gear, smoking meat, or even building shelters.
And the best part? You only need what's already around you.
What You Need
Three strong, straight poles (6–8 feet long)
Cordage—natural vine, paracord, or inner strands of 550 cord
A knife or cutting tool
That’s it. Nothing fancy. Just simple tools and jungle resources.
Step-by-Step: Lashing a Jungle Tripod
1. Prepare the poles
Look for hardwood saplings about wrist-thick
Trim off branches and bark for smoother handling
2. Set up the lash
Lay the poles side-by-side
Use a tripod lashing (wrap the cord around all three poles several times, then frap between the poles to tighten)
3. Stand it up
Spread the legs evenly to form a stable triangle
Adjust the lash if it feels loose or off-balance
4. Add function
Tie a crossbar or hang a pot from the center
Use it to support a raised bed, cooking setup, or dry rack
Why It Matters
In the jungle, a tripod is a multi-use survival structure.
You can build it fast with local materials—and no screws, bolts, or blueprints.
It’s a simple design that’s stood the test of time—used by indigenous groups, military survivalists, and anyone who lives close to the land.
Bottom Line
The jungle tripod is first technology—primitive and perfect.
If it works in the rainforest with nothing but a knife and cord,
it’ll work for you anywhere.

making a jungle tripod step by step

making a jungle tripod Instruction Video…
Day 14: How to make natural rope…
Action beats intention.

Making Natural Cordage
Primitive doesn’t mean weak—it means first, original, proven.
And few tools are more essential—or overlooked—than rope.
Cordage: The Underrated Survival Tool
While living with indigenous tribes in Brazil, I noticed what they valued most:
Machetes
Shorts
Fire tools
Cooking pots
Rope
They could make natural rope fast—with hands and feet—but still cherished synthetic rope for its unmatched strength and abundance.
Cordage is survival.
Use it to:
Haft tools
Build shelters
Set traps
Make bow drills
Create fire bundles
Repair gear
How to Make It
Pick the right plant
Not all fibers work
Look for Dogbane, Yucca, milkweed, or stinging nettle
Process the fiber
Strip, dry, and clean
Remove stiff outer bark and retain soft inner fiber
Use the reverse wrap
Twist one strand forward, then wrap it back around the other
Continue until you reach the desired length
Practice with other materials
Strips from a T-shirt
Juniper bark
Grass bundles
Where It’s Useful
Natural cordage works in:
Bow drills
Paiute deadfalls
Mojave scissor snares
Fire carriers like the Apache match
Smudge sticks made from sage
Bottom Line
Natural cordage isn’t just a bushcraft trick—it’s a critical skill.
If you don’t have rope, know how to make it.
Because when you need it, nothing else will do.

I just made this 2 inch tactical flashlight…
and i’m giving it to you for free i have limited stock so hurry (click above)
making natural rope Step By Step

making natural rope Instruction Video…
Day 13: Using a signal mirror when lost…
Discomfort sparks growth.

How to Use a Signal Mirror When You're Lost
Signal mirrors can save your life—but they’re harder to use than they look.
The real challenge: aiming the reflection.
Method 1: Dedicated Signal Mirror
If you have a purpose-built mirror with a sighting hole or hologram, use it:
Hold the mirror close to your eye
Aim it at the sun
Look for the bright spot or hologram flash inside the hole
Move the spot onto your target (plane or rescuer)
These mirrors are designed for accuracy and long-range visibility.
Method 2: Improvised Mirror
Using a shiny object (knife, metal lid, phone screen):
Hold it near your right eye with your right hand
Extend your left hand straight out
Make a “V” with your fingers like a finger gun
Shine the light onto the back of your left hand
Put your target inside the “V”
Flick the light up and down to flash your target
This method lets you aim without fancy tools.
Practice Before You Need It
Test this with a friend and a cell phone or radio at a distance.
Train in clear weather and get used to spotting and aiming the flash.
Bottom Line
Signal mirrors are simple but not intuitive.
With a little practice, they become a powerful way to be seen—even miles away.
Try it now—before you need it.Step By Step signal mirror use…


I DESIGNED A MEDICAL GO BAG THAT I BELIEVE EVERY SKILLED SURVIVALIST SHOULD HAVE…
I’m giving it to you for a discount simply because I want more people to be prepared grab yours (click above)
using a signal mirror Instruction Video…
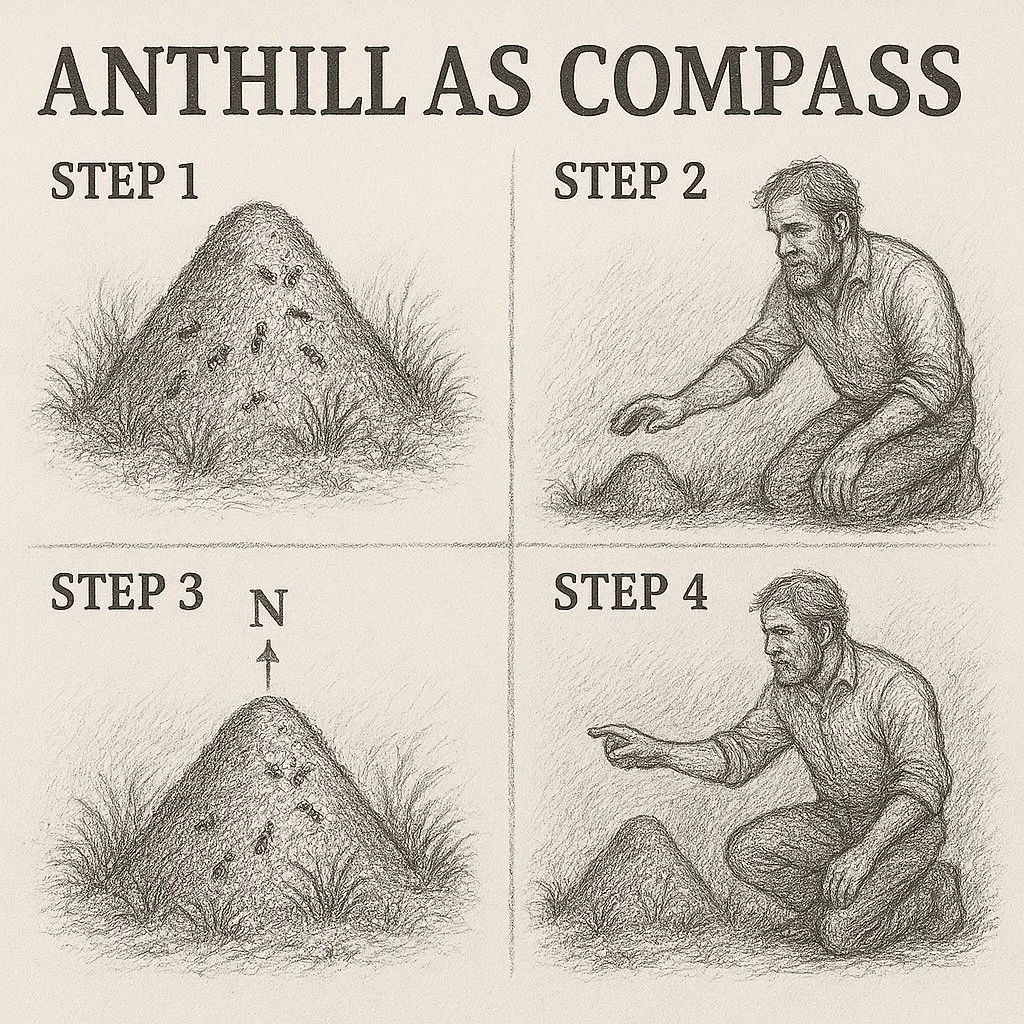
Day 12: Using a anthill as a compass…
Stay the course.

Finding North with an Ant Pile
It sounds like magic —but it’s pure environmental science.
Why It Works
Fire ants, like most animals, adapt to heat and wind in their environment.
In the Southwestern U.S., their mound entrances are built to:
Catch warmth in the cold morning
Avoid harsh sun in the hot afternoon
Shelter from prevailing west-to-east winds
Result:
Most entrances face South to Southeast
How to Use It
Find several undisturbed ant piles
Avoid ones damaged by cars, animals, or shaded by cliffs/trees
Observe the direction of the entrance holes
Average the direction—most will point South/Southeast
Use that to find North (opposite direction)
Why This Matters
If you got lost heading north, and all the ant piles face southeast,
you now know how to backtrack south—even without a compass.
Bottom Line
Nature leaves clues
Ants know where the sun rises.
You just have to notice.
Step By Step finding north with anthill card…

Here is a flashlight I made that I believe every survivalist should have…
I put it on a massive discount so i could put it in more peoples hands grab now (click above)
finding north with anthill Instruction Video…
Day 11: Using the sun as a compass…
Keep moving forward.

Finding North with Just the Sun
You can lose gear. You can break tools.
But knowledge stays with you—and it weighs nothing.
The Power of Directional Awareness
Knowing how to find North using just the sun is a simple, universal survival skill.
It won’t give you GPS-level accuracy—but it’ll get you moving in the right direction.
Basic Method (Northern Hemisphere)
Find a stick about 2 feet long
Plant it upright in the ground
Mark the tip of its shadow with a rock or stick (this is West)
Wait 15–30 minutes
Mark the new tip of the shadow (this is East)
Draw a line between the two marks
Stand with the first mark (West) on your left and the second mark (East) on your right
You are now facing North
This is called the shadow-stick method.
Notes & Variations
Works best mid-day with clear sunlight
Use longer intervals in winter or at higher latitudes
Doesn’t work well in dense jungle or deep canyons
Adjust expectations in polar regions (sun behaves differently)
Why It Matters
In many survival situations, you don’t need precision—you need a general direction.
Whether it's getting back to camp, finding a road, or handrailing a stream,
direction buys you distance—and distance gets you found.
Bottom Line
The sun is your compass Just Know How To Read It.
Knowledge weighs nothing.
But it can carry you a long way.Step By Step finding north with stick card…

if your a skilled survivalist and you don’t have this MEDICAL GO-BAG…
You could be at risk in the wild grab this for a massive discount above

finding north with sun Instruction Video…
Day 10: How animal poop can save lives…
Progress, not perfection.


$2500 WORTH OF MY TOOLS IM GIVING AWAY FOR FREE QUALIFY ABOVE (CLICK IMAGE)
Cow and Deer Poop Can Save Your Life
Sounds crazy—but it’s true.
Herbivore poop is one of nature’s most underrated survival tools.
Why It Works
Cows, deer, elk = grass-processing machines
Their poop is dried, compressed plant material
After a season in the sun, it’s dry, flammable, and fuel-rich
How to Use It
Fire fuel in treeless areas
Smudge fuel to drive off bugs
Ember carrier to move fire across long distances
Stick a coal inside a dried cow patty
Let it smolder for hours or even days
Revive it later with a fire nest
Real-World Application
In open prairies or high deserts where wood is scarce, dried poop is your firewood.
That’s what native peoples did.
That’s what you should learn to do.
Bottom Line
Don’t overlook the obvious.
In survival, the "gross" can save your life.
Learn your environment—see it with new eyes.
What once looked like waste might just be your next fire.
Step By Step animal dung card…

cow pie Instruction Video…
Day 9: Using sage brush…
Fear not.

Sagebrush: More Than Just a Bush
If you’ve spent any time in the West, you’ve seen sagebrush everywhere.
But do you know how to use it?
What Sagebrush Is Good For
1. Natural Cleanser
After 3 days without washing, bacteria and yeast build up fast
Native Americans used sagebrush smoke to kill microbes
It's antimicrobial and antibacterial—not just ritual, real hygiene
2. Field Toilet Paper
Soft, minty, and effective
Can save you when nature calls and there’s no paper in sight
Useful and comforting in a bad situation
Why It Matters
Sagebrush is:
Abundant
Multi-use
Medicinal
Often overlooked
Once you know how to use it, it stops being “just a bush” and becomes a survival tool.
Bottom Line
Sagebrush keeps you clean, fresh, and ready—from hygiene to emergency toilet paper.
Learn what grows around you.
The wild is full of tools—you just need to recognize them.Step By Step sage brush card…


YOU READ RIGHT I’M GIVING YOU THIS 2 INCH TACTICAL FLASHLIGHT FOR FREE READ MORE (CLICK IMAGE)
sage brush Instruction Video…
Day 8: Creating THE FIRE Piston…
His eyes were like fire.

The Fire Piston
The fire piston is an ancient fire-starting tool that works on compression ignition—just like a diesel engine.
How It Works
You compress air rapidly inside a small sealed cylinder
The sudden pressure creates heat—enough to ignite char cloth
That gives you an ember
Transfer the ember to a tinder nest, add oxygen, and you’ve got fire
The Technique: Hit. Pause. Pull.
Hit the piston down hard and fast
Pause for a second to let the spark take hold
Pull the piston out and check for the ember
Then move it to your tinder bundle and blow it to flame
Timing is everything.
Too fast and the ember won’t catch—too slow and it suffocates.
Bottom Line
The fire piston is a powerful primitive tool—but it takes practice.
Master the technique, and you can make fire from nothing but air, pressure, and knowledge.

Umbrellas don’t cut it in the wild…
Grab the Blak Poncho above for less than 10 bucks.(click above)
Step By Step Fire Piston Card…

FIRE PISTON Instruction Video…
Day 7: Creating THE FIRE BUNDLE…
build a man a fire, he'll be warm for a day

The Fire Nest (Fire Bundle)
The fire nest is the critical link between spark and flame, and between ember and fire.
Why It Matters
A fire nest:
Catches the first ember from a bow drill, hand drill, or flint and steel
Helps you restart a fire when it goes out overnight
Converts fragile sparks into full, usable flame
Without a proper nest, your ember dies, and so does your fire.
What Makes a Good Fire Nest
Dry, fibrous material (cedar bark, sagebrush bark, jute twine, dry grass)
Formed into a loose, airy bundle
Ember placed in the center
Blown into gently until it ignites
You want it fluffy enough for oxygen flow but dense enough to catch and hold heat.
Pro Tip
At night, place a smoldering ember in your fire nest, cover it with sticks, and it can reignite the fire in about 15 minutes.
Bottom Line
A good fire nest is essential for primitive fire starting and critical for survival.
Master the nest—master the flame.

If you can’t make fire you at least need light
Grab the Blak Lantern above (click image)
Step By Step Fire Bundle Creating Card…

Creating A Fire Bundle Instruction Video…
Day 6: USING fLINT AND STEEL
He is a consuming fire.

Flint and Steel (Not a Ferro Rod)
Flint and steel is old-school firemaking—used long before matches or lighters.
The trick?
It’s not just about the spark—it’s what you spark onto.
The Real Key: Char Cloth
Char cloth = plant-based fabric, cooked without oxygen
It’s what catches the spark and turns it into fire.
How to Make It
Use 100% cotton (old Levi’s or T-shirt)
Roll it up and place in a metal tin (like an Altoids can)
Toss the sealed can into a fire
Wait for the flame or smoke jet to stop
Remove it carefully
Let it cool before opening (oxygen too soon = burned cloth)
How to Use It
Place a piece of char cloth on the edge of your flint
Strike steel down across the flint with your other hand
Spark catches on the cloth
Transfer glowing ember to tinder bundle and blow into flame
Bottom Line
Forget magic tools—flint and steel still works.
If it was good enough for Grandma,
It’s good enough for you.

Here is a flashlight I made so every survivalist could have it…
i’m giving it to you for FREE so I could put it in more peoples hands grab now (click above)
Step By Step Flint And SteEL Fire Creation Card…

Flint & Steel Fire Creation Instruction Video…
Day 5: Using The ferro rod
Fear not.

The Ferro Rod: Modern Fire, Primitive Reliability
Not to be confused with flint and steel, the Ferro Rod is a firestarter made of ferrocerium and iron. It throws hot, blazing sparks—much hotter and more abundant than traditional steel sparks.
What Makes It Different
Ferrocerium ignites at 3,000–5,000°F
Creates a shower of sparks with minimal effort
More forgiving than flint and steel—ideal for beginners
Bonus: Magnesium Combo Kits
Many rods come with a magnesium block attached.
Here’s how to use it:
Scrape a small pile of magnesium into your tinder
Strike the Ferro Rod side to ignite the magnesium
Magnesium burns hot and fast—perfect for damp conditions
Pro Tip: Master Your Technique
Most people try to move the knife and aim sparks.
Don’t.
Instead:
Hold your blade steady, just above your tinder
Pull the Ferro Rod backward against the spine of the blade
This keeps your sparks focused and predictable
Now you can reliably ignite:
Shaved bark
Magnesium pile
Fluffed cambium
Dry grass or any natural tinder
Bottom Line
The Ferro Rod is one of the best fire tools on Earth.
Lightweight, low-fail, high-temp, and kid-friendly.
Learn the technique, trust the sparks.
Step By Step Ferro Rod Instruction Card…


vests are nice…
Heated, Tactical vests are better…
GRAB YOURS ABOVE
Ferro Rod Video Instruction…
Day 4: Creating A Bow Drill Fire
Who the Son sets free, is free.


EVERY SURVIVALIST NEEDS A MEDKIT…
I MADE ONE THAT YOU SHOULD TRAVEL ON THE GO WITH…
GRAB YOURS ABOVE.
Bow Drills
Bow drills seem tough at first—but with practice, they’re one of the most reliable friction fire methods.
Why Egyptian Style?
Works great with 550 cord, shoelaces, or shirt strings
Super adjustable and forgiving with modern materials
What You Need (5 Parts):
Bow – Green stick (thumb-thick, springy like willow)
String – Tied with tension-adjusting wraps
Spindle – Bone-dry and straight; think “banana cut straight”
Hearth board – Flat, dry wood about spindle thickness
Socket – Low-friction top (knife divot, stone, or wood)
Pro Tips:
Fire harden your bow after first use
Add green leaves or sap to the socket to reduce friction
Aim for high friction on the hearth board, low friction on the socket
Your spindle must roll smooth—like a marble on tile
Practice creates mastery—this is a skill no one can take from you
Bottom Line
Mastering bow drills gives you fire from nothing.
And like all true survival knowledge—it weighs nothing.
Step By Step Bow Drill Instruction Card…

Bow Drill Fire Creation Instruction Video…
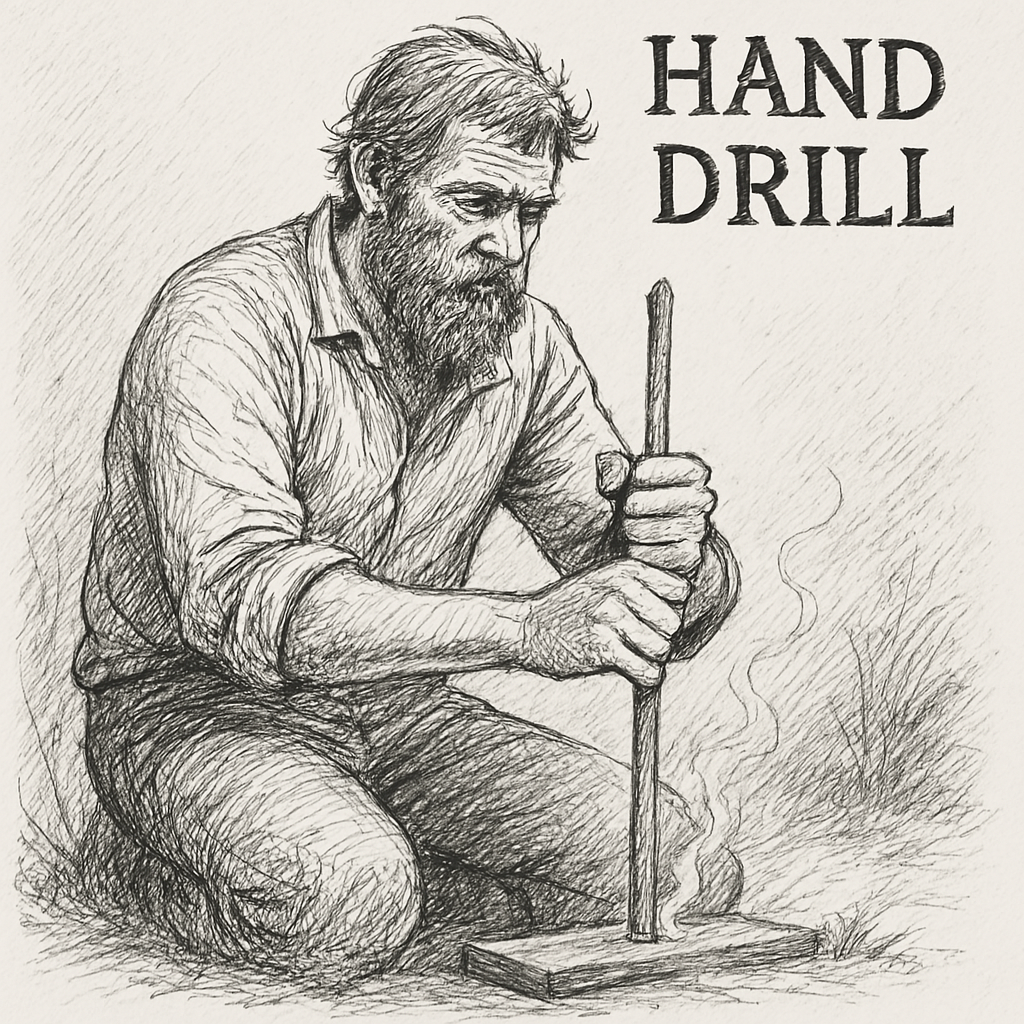
Day 3: Creating A Hand Drill Fire
Be Kind Always.
Be Kind Always.
Hand Drill
The hand drill is the most primitive friction fire method—but it’s also the easiest to build.
Why Hand Drill?
Works with just two sticks
No cord, knife, or bow required
Perfect for no-gear survival scenarios
What You Need (2 Parts)
Spindle – Straight, dry stalk
Hearth Board – Dry, soft wood (cottonwood, willow, cedar)
Pro Tips
Use plant dust, shirt fabric, or ash to reduce hand friction
Spin slow to warm it up, fast to ignite
Cut a notch in your hearth board to catch the ember
Keep elbows on knees for stability and control
Bottom Line
Mastering the hand drill gives you fire with zero gear.
It’s tough—but it’s simple.
And like all survival knowledge—it weighs nothing.
Step By Step Hand Drill Fire Instruction Card…


I HATE SLEEPING ON THE COLD FLOOR IN THE WILD…
SO I MADE A PORTABLE SURVIVAL MATTRESS GRAB YOUS ABOVE.
Hand Drill Fire Creation Instruction Video…
DAY 2: FIRE SCIENCE LAws…
Always Learn.


MY DEFENSIVE FLASHLIGHT…
I’M PUTTING ON A MASSIVE DISCOUNT GRAB YOURS ABOVE.
Fire science: Fire science, why does it even matter? Have you ever watched a Boy Scout trying to light a green tree on fire with a lighter? After a few minutes they have a black stick, a halfway full Bic lighter and no fire. I have, why doesn't it work? Well, the answer is fire science.
So let's talk a little bit about it.
Fire Science
Fire isn’t magic—it’s a formula.
And if you don’t understand it, you’ll waste lighters, energy, and time.
The Fire Triangle
Every fire needs:
Heat – Sparks, friction, or flame
Fuel – Dry wood, tinder, gas
Oxygen – Airflow around the fire
Take away any one—and the fire dies.
What’s Actually Burning?
Fire burns gas, not wood
Heat turns wood into gas
The gas mixes with oxygen and creates the flame
That’s why flames hover just above the wood—not touching it
Why Fires Fail
Wet wood steals heat and kills ignition
No airflow? No fire—oxygen gets cut off
Too much wood on top? You suffocate the flame
Pro Tips
Build fires off the ground—oxygen flows better
Use a log cabin or teepee structure for air space
Only use dead, dry, finely processed wood
Bottom Line
Fire is science, not guesswork.
Understand the triangle, control the elements, and your fires will always light.
Day 1: Understanding Survival PRIORITIES
Stay Humble.


One of the most crucial survival priorities are survival knives grab the unbelievable voyager knife for a one time deal.
Survival Priorities
People ask, “What do I do if…?”
The answer: follow the Rule of Threes.
What Is the Rule of Threes?
A field-tested guideline that helps you focus on what kills you fastest—so you can survive anything.
Tyler’s Rule of Threes
3 Seconds Without Security
Gunfights average 3 seconds
Have a plan: firearm, blade, exit path, or location
Stay strapped or get clapped
3 Minutes Without Air
Drowning, smoke inhalation, airway blockage
Always carry survival gear on your person—not packed away
3 Hours Without Shelter (in harsh weather)
Hypothermia or heat stroke will kill fast
Your first shelter is your clothing—dress for survival
Then: sleeping bag > bivy > tent > natural shelter
3 Days Without Water
Depends on the environment
Water before food—always
3 Weeks Without Food
Hunger won’t kill you fast
You can survive on fat stores—prioritize shelter and water first
Don’t ration—binge and burn
3 Months Without Companionship
Isolation breaks the mind
Connection is survival too
Bottom Line
Gear matters.
Skills matter more.
But knowing what to do first is what keeps you alive.
Master your priorities—and go home and eat tacos.